Wednesday, 31 August 2016

"In For a Penny, In For a Pound"

So one of the biggest aspects of the barn restoration has now begun. After a lot of consideration it has been decided that we will have to hire someone to do the foundation work that needs to be done. It is certainly not because Francis could not do it, he could, and would...... it is just that the project is massive and with him being a one man show, being posted in Ottawa and only home on weekends it is just too big a task. 

Therefore, although the cost is much more than we ever envisioned when starting out on this restoration journey, we have to decided to take the plunge and hire a contractor to do the foundation work. Also, once started it needs to be completed before the fall rains start.
The work will be done in phases to ensure we do not damage the old stone foundation further- it is collapsing and falling in at a couple of places already. 

The phases consist of:
1) making a new footing for the new cement foundation wall
2) pouring a new foundation wall to support the old stone foundation
3) pour 4 cement "buffer" walls that will be at a 90 degree angle to the new foundation to help keep it "pushed back"
4) excavate the outside of the foundation
5) waterproof the old foundation from the outside
6) build cement pilons into the ground to which steel cables will be connected. These cables will go underground to the foundation; passed through the foundation and attached on the inside of the new wall. This will help "hold" the foundation against the pressure of the earth bank.

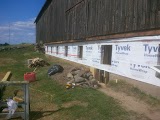
Over the years,the floor has heaved upwards and cracked, and the whole wall is "bowed" inwards. Many years ago(hmm like 25yrs at least), Dave and I made some repairs to the wall to fix the loose stones. However, the wall has continued to bow inwards over the years as water and the "bank" of earth against the foundation has continued to put pressure on the foundation from the outside.Water has leaked into the stones; frost and heaving occurred and  over time it has become very damaged. We can't replace the whole foundation, so we are going to pour a new footing  on the inside, and pour a new cement foundation wall that will adjoin to the old stone one.


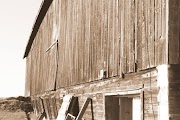
In the picture to the right you can see the current state of one section of foundation. On the left is a section that has fallen in; on the right is a section that Francis has restored/ repointed. The part he fixed only had a few ( ok, a lot) loose stones and some missing mortar. 


The foundation as it is now- note the mold on the walls where
water comes through...you can't see how crooked it is here, but
the top of the wall is leaning in several inches in compared to the
bottom of the wall ( kind of like the other outside wall was)
The second picture shows the foundation before commencement of the work. 
Excavating for the new footing


New footing poured--- rebar in place


We are now ready for the contractor to come back and start framing for the new foundation wall.... that was supposed to be last Friday but we are still waiting.....The delays are driving Francis to distraction..They are supposed to back tomorrow....


Thursday, 25 August 2016

Bird's Eye View

Before the weather got super hot, Francis went up onto the barn roof to screw down the roof a bit more securely. The hope was that it would stop some of the leaks into the stalls we have :( 

While up there he took some lovely photos of the property- quite a unique and different perspective. Just for fun I am posting here. The property is 7.25 acres or 7.5(can't remember exactly), about 2.5 are what the house rest on, and the the remaining 5 are the barn and pasture etc. However, I am extremely lucky as the farm around and behind us belong to my ex-husband Dave, and he lets me have access to the 300 acres.......hence Marina and I enjoy amazing hacks! You can see that land in the background of the pictures.


Looking from front of barn toward house
Looking to the left-- Francis' workshop (that he renovated) and
horse pasture
View of the back-- round pen and horses grazing; 
Machinery shed/ run in shed for the horses
You'll note a few patches of yellow dead grass -- July and the first 2 weeks of August were extremely hot with no rain at all..temperatures above 30 degrees Celsius most days. The whole area surrounding the barn dried up and turned into "crispy crunch" ... it is starting to come back now since we've had two heavy rainfalls. Due to the weather Francis has not been able to do more work on the roof-- it gets far too hot!!

Monday, 22 August 2016

Childhood memories and nursery rhymes

Our barn is kind of like the nursery rhyme---

                             There was a crooked man, and he walked a crooked mile.
                           He found a crooked sixpence upon a crooked stile.
                            He bought a crooked cat, which caught a crooked mouse
                      And they all lived together in a little crooked house."

You see the barn is ever so crooked as you will see in this post, and Francis can walk a little crookedly at times ( especially after a hard day working on the barn" and instead of a house , put barn  and replace mouse with horse........okay it won't rhyme anymore but who knew when I was singing this as a child that it would come true (LOL).

This picture shows the outside barn wall before Francis started his holidays.........Please note the lower section is leaning outwards, windows are falling out etc....
The entire outside wall on the lower section of the barn had to be replaced... quite the challenge considering it was holding up the upper section. But no feat is beyond my magic man! He just seems to envision the end result, develop a plan to get there, and starts it-- he goes bit by bit until he is finished. I know several people who commented that it "couldn't be done", was " way too big an undertaking"," not possible". But low and behold in 10 days it was done! Sure it helps that we had put aside some money to reno the barn, but it is purely Francis' belief in himself, the love of challenges and his love for me, that brought it all to fruition. 


So in case you are wondering how on earth he did it, process went something like this:
  • outside barn boards removed and stored in the "workshop" ( another old building he rescued a couple of years ago)
 

  • build a new supporting structure  on the inside of the foundation wall inside the barn; this could only be done section by section as we only had so much wood to work with. So he would build his supporting frame, build the inside wall; knock out the old leaning wall, build a new outside wall; take down the supporting structure on the inside, rebuild it again for the next section (rinse and repeat). Apart from not having enough lumber, I am sure he was also thinking the  old girl may not like having all her stuffing knocked out at once. She groaned the odd time or to when he jacked up the frame in places. As for me, I couldn't watch it-- I just kept coming back up to make sure he was still alive........He could only do about 16 feet at a time so it was tedious work. It's hard to see here due to the lighting but you will get the idea of the how big a task it was-- there was I every minute afraid the whole thing would tumble down on top of him! NOthing holding it up except  few boards ( ok more than a few) that he strategically screwed together. But I talked to the lovely old girl( yes,I think my barn is a girl and has a spirit of her own), and told her that she must stay standing as we are trying to restore her to her former glory ( and then some I think). I do so love this barn!!
 

  •   then he had to build a new wall on top off the "inside" part of the foundation wall; after which he tore out all the old leaning wall supports and built another wall to replace it. So we ended up with a "double" wall sitting on the foundation

the new "inside wall"

The new outer wall complete with
new window


    note the overhang above the new wall- this is how far the barn has "shifted" over the years and how far out the old wall was leaning- what we thought was only 8 inches turned out to be a move of 19 inches!!!
    it looks like its being held up by toothpicks!!


  • next step was putting new plywood sheeting on the exterior


    • The first sheet of plywood
      Plywood completed!

      Cutting out the holes for new windows!!


      • next came putting on the waterproof membrane ( or house wrap)-- and yes, I actually helped with this!


      • and then the finished product. This is what it looks like now. It still needs the old barn boards put back on to make it look like it did in the beginning... but that is basically cosmetic so can wait for now.

      Summer Holidays ????

      Well it has been several weeks since I last posted to the blog, but that does not mean that nothing has been happening....far from it. In fact so much has transpired that I hardly know where to begin! 

      The barn work kind of ground to a halt during the month of July as the tenant's at Francis' house moved out and he had a lot of work to do to get it returned to its former beauty in order to rent again. He was very disheartened by the task as his quaint little "cottage" in town looked like a run-down slum tenement....however, true to "Francis magic" it is now looking spic and span and returned ( for the most part) to the way it was when he lived there. I did my part and weeded the front flower beds and planted new perennials. IN fact, testament to all his work is the fact that it has been re-rented within 7 days of being put back out on the rental market.  

      I have so many pictures of the barn work that I think I will make several posts- one for each mini-project. My first comment lately when he shows me what he has done has been, "Did you take pictures?"--lol

      Francis started his 3 weeks of  holidays the last week of July. The first week was mostly used to revitalize his house but the last two were spent totally immersed in the barn restoration. The weather cooperated mostly as we had no rain but it was extremely hot- average temp 33 degrees C and with humidex many days were 40+. Despite this he worked many days for 10 hrs in scorching sun in order to get big jobs finished. 

      stall gate- finished product
      One small project that was done in July was putting up stall gates for the horse stalls. These allow the horses to literally " hang out" while hanging out in the stalls. The stall gates were as usual designed by me , and Francis transformed the concept into reality... I wanted them to be in keeping with the overall feel of the barn but be sturdy enough to withstand curious horses that can be a bit pushy at times. So I started off with the idea of a board, which grew into the idea of a cedar post to be used as the "gate" aspect.
      latch with hole and "thingy" in place!
      Then the problem of how to attach??? Well true to the mastermind he is, Francis came up with the idea of installing gate latch pins on each side of the stall entry, with a corresponding "thing- a -ma- jig" in the cedar pole ( a screw with a round hole at the end). You can see how technical I am, I have no idea what it is called but it worked!). He then drilled little holes in the gate latch part so we could put another little "thingy" (can't remember the correct name- my Alzheimer's acting up again) through the hole so the horses couldn't decide to put their heads under the posts and try and lift the poles  off the latches ( and yes they really would try that!!). You see we have some very clever horses in the barn that have figured out how to open tack room doors, open freezer lids ( ps the freezer hold the horse feed and that know it).....so we had to preempt escapees!!
      Francis sanding the posts- he
      wouldn't want them to get s
      splinters!

      Francis giving Raphi instructions
      on how to use the stall gate- ie hang
      your head out........

      Pippa - " Raphi, what is this thing?"  "  Did you get one too?"